Social media par aajkal surreal aur emotional cinematic videos sabse zyada viral ho rahi hain. Agar aap Instagram Reels ya YouTube Shorts par scroll karte hain, toh aapne dekha hoga ki aisi videos jinme background mein ek bada sa, deep aur emotional face aasmaan (sky) mein blended hota hai, unpar millions mein views aate hain. Aisi editing ko hum Surrealism Art kehte hain, jahan real world aur dream world ko aapas mein merge kiya jata hai.
Agar aap bhi apne projects ke liye Girl eyes Sky editing background hd download karke ek professional video ya photo design Karna chahte hain, toh sabse pehle aapko ek high-quality aur accurate base asset (image) ki zaroorat hoti hai. Is guide mein hum baat karenge ki kaise aap modern AI techniques, custom prompts, aur professional colour grading workflows ka use karke ekdam unique aur high-definition art create kar sakte hain.
Pro AI Artwork Reference: Perfect Composition Kaise Set Karein?
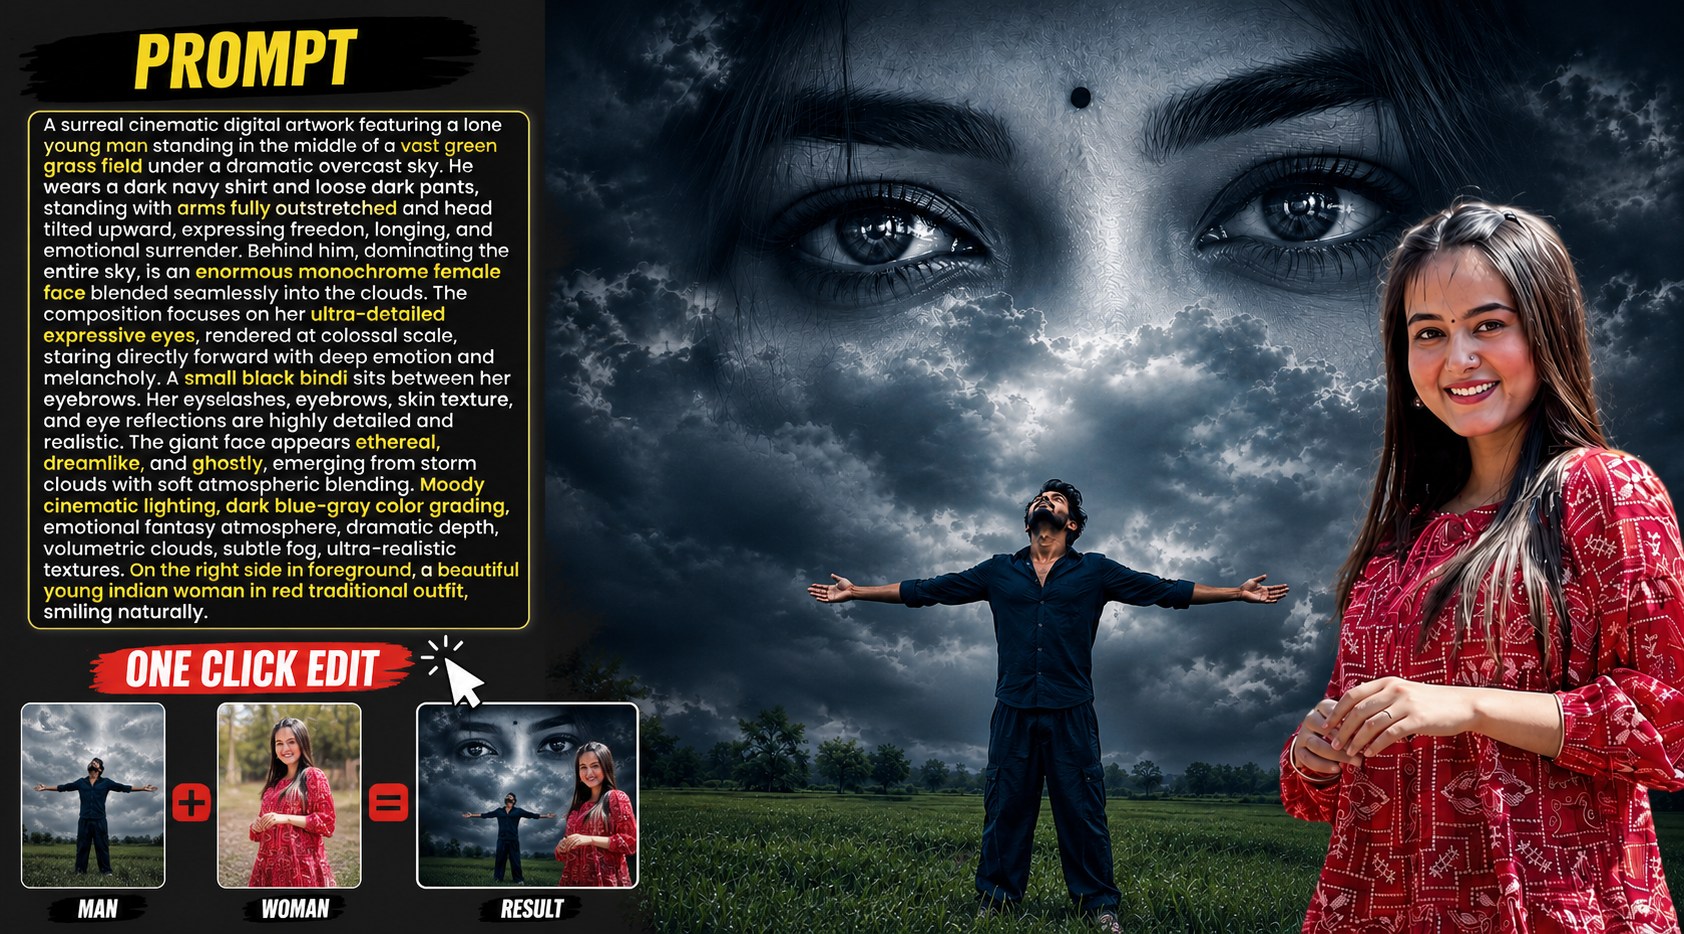
Ek sachi cinematic feel tab aati hai jab aapki video ka background environment realistic aur emotional lagta hai. Agar aap is project ke liye khud ka ek perfect base material design karna chahte hain, toh niche diye gaye Master Prompt ka use kar sakte hain. Yeh composition aapko sikhayegi ki real cinematic scaling aur depth kaise generate hoti hai: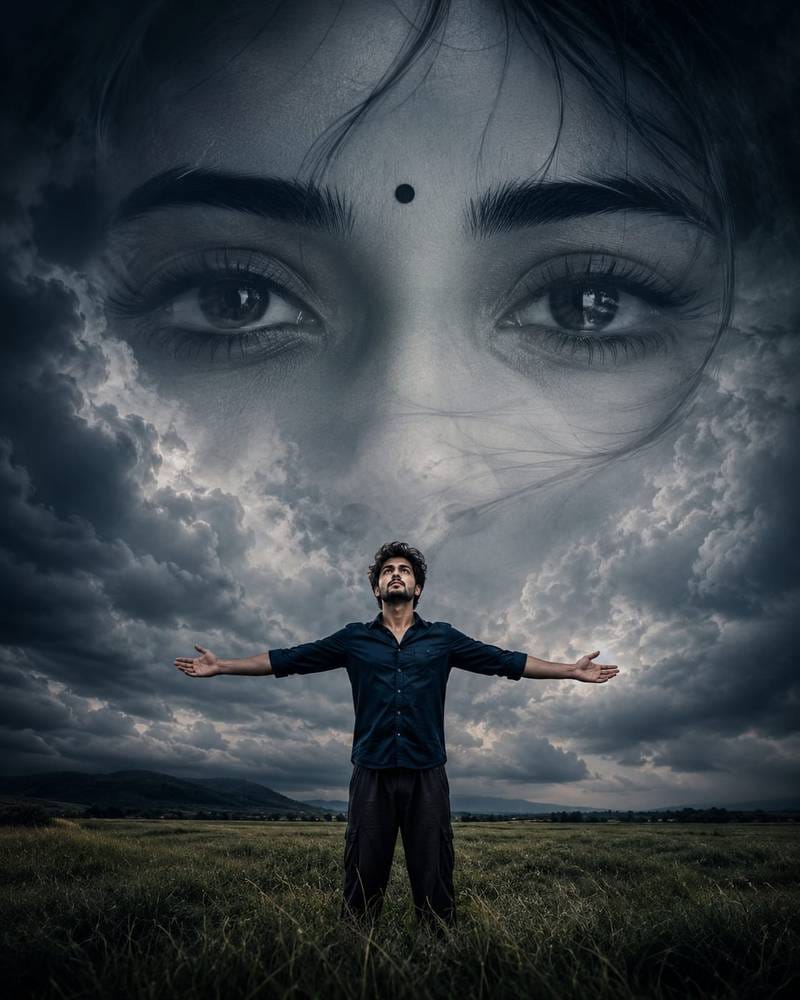
Prompt Copy”
A surreal cinematic digital artwork featuring a lone young man standing in the middle of a vast green grass field under a dramatic overcast sky. He wears a dark navy shirt and loose dark pants, standing with arms fully outstretched and head tilted upward, expressing freedom, longing, and emotional surrender. Behind him, dominating the entire sky, is an enormous monochrome female face blended seamlessly into the clouds. The composition focuses on her ultra-detailed expressive eyes, rendered at colossal scale, staring directly forward with deep emotion and melancholy. A small black bindi sits between her eyebrows. Her eyelashes, eyebrows, skin texture, and eye reflections are highly detailed and realistic. The giant face appears ethereal, dreamlike, and ghostly, emerging from storm clouds with soft atmospheric blending. Moody cinematic lighting, dark blue-grey colour grading, emotional fantasy atmosphere, dramatic depth, volumetric clouds, subtle fog, ultra-realistic textures. 4:5 8K
AI Prompt Ko Customise Aur Use Karne Ka Step-by-Step Guide
Agar aap is prompt ko copy-paste karke direct image generate karenge, toh aapko ek amazing output milega. Lekin ek smart editor tabhi banta hai jab woh kisi asset ko apne creative vision ke mutabik badal sake. Niche diye gaye steps ko follow karke aap is prompt ko kisi bhi AI image generator (jaise Midjourney, Bing Image Creator, ya Leonardo AI) mein customise kar sakte hain:
Step 1: Character Aur Emotions Ko Badlein (Subject Customisation)
Hamare main prompt mein ek young man field mein khada hai jo freedom aur surrender show kar raha hai. Aap is story ko apne video ke theme ke hissaab se change kar sakte hain.
• Kaise Badlein: Agar aapko wahan kisi ladke ki jagah ek ladki ko dikhana hai, ya kisi ko rote hue (crying) dikhana hai, toh prompt ki starting line ko replace karein.
• Example Change: “A surreal cinematic digital artwork featuring a lone young woman sitting on a rock near a stormy ocean, holding her knees close, expressing deep heartbreak and loneliness…”
Step 2: Sky Aur Environment Ka Mood Set Karein (Background Lighting)
Mausam aur aasmaan ka rang poori video ka mood define karta hai. Prompt mein abhi overcast sky aur dark blue-grey colour grading hai, jo ek sad aur emotional feel deta hai.
• Kaise Badlein: Agar aapko thoda romantic, dreamy ya fantasy-oriented look chahiye, toh aapcolourss aur clouds ke type ko alter kar sakte hain.
• Example Change: “under a golden hour sunset sky with soft pink and orange clouds, warm cinematic lighting, nostalgic dreamlike atmosphere…”
Step 3: Face Aur Eyes Ke Features Ko Modify Karein (Core Keyword Adjustment)
Kyunki hamara main core topic Girl eyes Sky editing background hd download hai, isliye aasmaan mein dikhne wali aankhon par sabse zyada dhyan dena hai. Prompt mein abhi monochrome female face aur small black bindi hai.
• Kaise Badlein: Aap aasmaan ke face ke features ko badal sakte hain, jaise usme tears (aansu) add karna ya bindi ko remove karna, taaki woh globally relatable lage.
• Example Change: “an enormous female face blended seamlessly into the clouds, with a single crystal tear rolling down from her ultra-detailed expressive eyes, looking down with eternal sadness…”
Step 4: Aspect Ratio And Quality Settings Set Karein (Output Resolution)
Mobile videos (Reels/Shorts) ke liye hamesha vertical format sabse best hota hai. Prompt ke end mein 4:5 ratio diya gaya hai.
• Kaise Badlein: Agar aap pure vertical shorts ke liye background design kar rahe hain, toh resolution ko 9:16 par set karein. Agar aap YouTube video ke liye thumbnail wana rahe hain, toh use 16:9 mein convert karein.
• Example Change: Prompt ke aakhiri hisse mein 4:5 8K ko hata kar 9:16 aspect ratio, ultra-high definition, photorealistic add karein.
AI Generated Images Aur Videos Ki Professional Colour Grading Kaise Karein?
AI-generated images aur videos ke sath sabse badi dikkat yeh hoti hai ki unke colours kabhi-kabhi over-saturated, fake ya ekdam artificial lagte hain. Agar aap alag-alag AI assets ko ek sath merge kar rahe hain, toh unka lighting aur colour match na hona poore project ko kharab kar deta hai.
Ek professional editor ki tarah AI content ko cinematic aur realistic banane ke liye, aapko yeh step-by-step professional colour grading workflow follow karna hoga. Chahe aap Premiere Pro, DaVinci Resolve, CapCut ya Photoshop use kar rahe hon, yeh basic rules har jagah same kaam karte hain:
1. Colour Correction (Base Mazboot Karein)
Colour grading shuru karne se pehle Colour Correction karna zaroori hai. Iska matlab hai video ya image ke default defects ko theek karna taaki editing ke liye ek clean base mile.
Exposure & Contrast Adjustment: AI images aksar bohot zyada bright hoti hain. Pehle exposure ko balance karein. Contrast ko thoda badhayein taaki dark aur light areas alag se define ho sakein.
White Balance (Temperature): Agar aapka scene emotional ya sad hai, toh temperature ko Cool (Blue side) le jayein. Agar scene romantic, nostalgic ya warm hai, toh temperature ko Warm (Yellow/Orange side) shift karein.
Highlights & Shadows: AI ke generated bright areas (highlights) ko halka sa kam (crush) karein taaki details wapas aa jayein, aur shadows ko thoda deep karein taaki visual mein real depth dikhe
2. Tone Mapping and Saturation Control
AI-generated media mein colours bohot “digital” aur chubhney wale hote hain. Hume unhe film-style look dena hota hai.
De-Saturate the Over-Saturated: Sabse pehle poore video ki saturation ko 5% से 10% kam karein. AI ke bright greens aur neon blues ko thoda down karna zaroori hai taaki woh aankhon ko chubhein nahi.
HSL (Hue, Saturation, Luminance) Panel: Yeh sabse important tool hai. Agar aasmaan (sky) ka rang bohot fake blue dikh raha hai, toh HSL panel mein jaakar specific BlueColourr ki saturation kam karein aur uski Luminance (brightness) ko thoda dark karein. Isse aasmaan ekdam deep aur cinematic lagega.
3. Foreground Aur Background Ka Colour Matching
Agar aapne AI se background generate kiya hai aur usme apna cutout ya koi dusra character add kiya hai, toh dono colour mix hona chahiye.
Light Wrap Effect: Background ki lighting ka asar aapke foreground character ke edges par dikhna chahiye. Agar peeche badal hain aur dark blue sky hai, toh character ke shoulders aur baalon par halka sa blue tint aana chahiye.
Shadow Matching: Jo colour background ki sabse dark shadow ka hai (jaise dark navy blue), wahi colour aapke character ki shadow ka bhi hona chahiye. Iske liye aap Color Wheels mein jaakar Shadows ko halka sa us specific color ki taraf drag karein.
Asset Name
Resolution Required
Ideal Format/Settings
Main Subject Cutout
4K or HD
PNG or Alpha Matted Layer (Clean Edges)
Girl Eyes Sky Background
8K / Ultra HD
Generated via a customised AI prompt
Overcast Storm Clouds Overlay
1080p 60fps
MP4 format for smooth motion loop
Cinematic Dust & Fog Particles
1080p
Overlay file with the screen blending option
Bonus Tip: Custom Luma Key Framework
Agar aap apni screen par extreme detailing chahte hain aur chahte hain ki aasmaan ki lighting ke hissaab se girl eyes ka background adjust ho, toh Luma Key effect ka use karein.
Gyan Ki Baat: Luma Key aapke background photo ke sirf sabse bright (white) ya sabse dark (black) areas ko extract karta hai.
Kyunki hamara prompt aur concept ek monochrome (black and white) face demand karta hai storm clouds mein, Luma key lagate hi aapke original face ka jo light weight structure hai, woh automatic aasmaan ke realistic storm clouds ke gap mein fit ho jayega. Isse aapko ghanton baith kar frame-by-frame masking nahi karni padegi.
Conclusion
Editing sirf tools ko cut aur paste karne ka naam nahi hai, yeh ek emotion ko bina bole screen par deliver karne ki art hai. Jab aap custom prompts ka use karke Girl eyes Sky editing background hd download karein, toh har ek choti detailing jaise ki shadows, blending modes, aur colour tones par dhyan dein. Jitna zyada aap text description ko badal-badal kar explore karenge, aapka visual output utna hi unique aur professional nikal kar aayega. Apne creative vision ko expand karte rahiye aur naye trends ke sath experiment karte rahiye. Keep creating!