
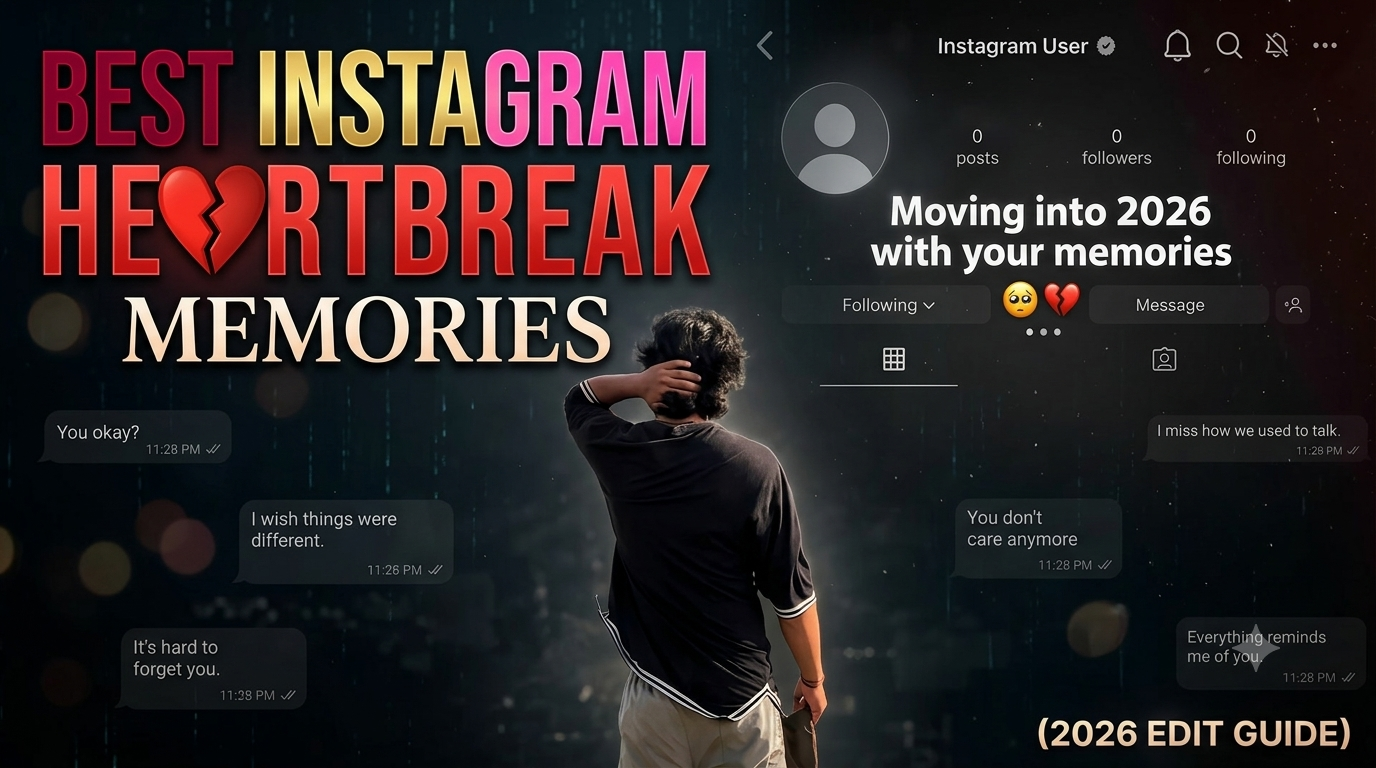
Aaj ke time mein Instagram Reels, Stories, aur Feed Posts par aesthetic emotional photo edits ka craze peak par hai. Jab kisi relationship ya purani yaadon ka phase badalta hai, toh log apne emotions ko social media par text aur visuals ke through express karna chahte hain. Is saal 2026 mein sabse zyada trending topic Instagram Heartbreak Memories Edit bana hua hai.
Pehle professional graphic designers ko Photoshop ya Lightroom mein complex layers, gradient masks, aur screen overlays setup karne mein ghanton ka waqt lagta tha. Lekin ab AI image generation tools ki madad se aap apni normal portrait photo ko ultra-realistic, dramatic heartbreak memory post mein convert kar sakte hain. Is guide mein hum step-by-step sikhenge ki kaise aap AI prompts aur smartphone editing tools ka sahi tarika use karke emotional visual masterpieces create kar sakte hain.
What is an Instagram Heartbreak Memories Edit?
Ek Instagram Heartbreak Memories Edit ek cinematic photo style hai jahan aapki real photograph ko dark moody tones, faded Instagram UI elements, dark text overlays, aur nostalgic breakup visual themes ke sath combine kiya jata hai.
Is edit ka main aim visual storytelling hota hai. Is style mein niche diye gaye visual elements ka use kiya jata hai:Dark & Faded Instagram UI: Background mein “Instagram User” ya default avatar ka overlay hota hai jo block ya deleted profile feel deta hai.Moody & Low Saturation Colour Grading: Bright colours ko reduce karke black, grey, aur desaturated tones ka use kiya jata hai.Emotional Text Typography: Heavy bold text overlays jaise “Moving into 2026 with your memories” ya “ALVIDA” add kiye jaate hain.Cinematic Film Effects: Dust particles, film grain, light leaks, aur blurred background vignette ka combination photo ko realistic banata hai.
Powerful AI Prompts for Instagram Heartbreak Edits
Apni photo ko 100% realistic heartbreak style mein convert karne ke liye hum do alag-alag high-quality AI prompts ka use karenge. Aap in prompts ko copy-paste karke directly perform kar sakte hain.
Prompt 1: Faded Profile & Memories Overlay
Ye prompt un logon ke liye perfect hai jo background mein dark Instagram user interface, chat overlays, aur soft atmospheric lighting ka combination chahte hain.
Prompt Boy – 1

Create a dark, emotional Instagram heartbreak memories edit using the uploaded photo. Keep the person’s face, hairstyle, skin tone, body shape, clothes, and pose 100% unchanged. Do not modify identity. Design: • Background should be dark, faded, and slightly blurred. • Add a large semi-transparent Instagram profile interface behind the subject. • Profile picture should appear removed with a default Instagram avatar. • Username: “Instagram User” • Add Profile, Search, Mute, and Options icons. • Use a black and grey color theme with a soft vignette. • Add subtle film grain, motion blur, dust particles, and cinematic lighting. • Place the subject at the bottom center with a soft shadow. Text (large bold white font): “Moving into 2026 with your memories” Below the text add: … Additional effects: • Broken heart emoji • Sad emoji • Faded chat/message overlays in the background. • Instagram aesthetic, nostalgic breakup vibe. • Moody color grading with low saturation. • High contrast, realistic photo edit. • Soft g
Prompt Girls’ – 2

Use the provided template image (image_4.png) as the exact layout for this edit. You must maintain the entire interface overlay, including the top circular profile icon (with the pink bow), the ‘Instagram User’ text, all interface icons, and the ‘ALVIDA ’ text in their exact original positions. Do not move, alter, or delete any of these overlay elements. Take the person from the new photo provided and place them as the large central figure, replacing the old figure. The new person must be rendered with the exact same framing (half-body or full-body) as in the input photo. Apply a cinematic ‘Black & White’ style, but ensure it is balanced and medium-dark—do not make it overly black or crushed. The subject’s face, features, and clothing must be clearly visible with natural skin tones and balanced contrast, maintaining a high-quality cinematic look without being excessively dark. The background should be a dark, cinematic forest scene, but clearly distinguishable from the subject. Most importantly, the final out
Step-by-Step Guide: How to Use Prompts in Google Gemini
Google Gemini AI advanced image processing support karta hai. Agar aap Gemini ke through apni photo edit karna chahte hain, toh in simple steps ko follow karein:
Step 1: Apne browser ya mobile app mein Google Gemini open karein aur login karein.
Step 2: Prompt input area mein diye gaye Image / Plus (+) icon par click karke apni original portrait photo upload karein.
Step 3: Upar diye gaye Prompt 1 ya Prompt 2 mein se kisi ek ko copy karke Gemini ke chat box mein paste karein.
Step 4: Send / Generate button par tap karein aur Gemini ko 5 se 10 seconds tak process karne dein.
Step 5: Resulting HD 4K image ko review karein aur direct Download button par click karke device mein save kar lein.
Step-by-Step Guide: How to Use Prompts in ChatGPT
ChatGPT (GPT-4o Vision Engine) images analyse aur generate karne ke liye ek behtar option hai. Iska workflow niche diya gaya hai:
Step 1: ChatGPT application ya web portal open karein aur GPT-4 model active karein.
Step 2: Attachment icon par tap karke apni photograph (aur Template image agar Prompt 2 use kar rahe hain) select karke upload karein.
Step 3: Prompt box mein exact Prompt Text ko paste karein.
Step 4: Text prompt aur image reference submit karein. ChatGPT image vision processing start kar dega.
Step 5: Final generated emotional edit render hone par resolution verify karein aur high definition mein export kar lein.
How to Customise These Prompts for Personalised Results
Har editor ka visual preference alag hota hai. Aap in prompts ke andar subtle modifications karke apni photo ko customised look de sakte hain:
Text & Typography Change: Prompt mein “Moving into 2026 with your memories” ya “ALVIDA” ki jagah apna custom emotional quote jaise “Chapter Closed”, “Lost in Memories”, ya “Some endings are quiet” add kar sakte hain.
Year Parameter Update: Agar aap future ya present time set kar rahe hain, toh prompt text mein year digits ko update kar lein.
Background Environment Shift: Prompt 2 mein dark cinematic forest scene ki jagah rainy city street night, misty ocean beach, ya empty neon alley likh sakte hain.
Colour Grading Preferences: Pure black and white ki jagah desaturated vintage warm tint ya cyan-teal dark aesthetic request kar sakte hain.
Professional Post-Processing Workflow for Smartphone Editors
AI se photo generate karne ke baad use 100% human-edited natural look dene ke liye ek quick 2-minute mobile workflow adopt karein:
Snapseed Vignette & Grain: Photo ko Snapseed mein open karke Grain (+12) aur Inner Brightness (-10) adjust karein. Isse AI plastic smoothness khatam ho jayegi.
Lightroom Mobile Colour Adjustments: Lightroom app mein Saturation (-25) decrease karein aur Dehaze (+10), Clarity (+15) increase karein.
Lightroom Shadow Recovery: Shadow slider ko slightly (+8) up karein taaki dark forest ya dark background mein details crush na ho.
Bonus Tip: Add Moving Particle & Audio Overlay in CapCut
Agar aap is heartbreak memory photo edit ko Viral Instagram Reel mein convert karna chahte hain, toh ye quick bonus editor trick use karein:
CapCut / VN Editor app mein apni newly generated photo import karein.
Photo duration ko 7 to 9 seconds set karein.
Background mein subtle Dust Particles Overlay (Screen Blend Mode) aur Slow Zoom-In Animation (Keyframe) add karein.
Ek slow, aesthetic trending lofi sad background track attach karein.
Export resolution 1080p at 60 FPS select karke Instagram Reels par upload kar dein.
Conclusion
Instagram heartbreak memories edit banana ab sirf high-end PC editors tak limited nahi hai. Google Gemini aur ChatGPT jaise AI platforms ke sath sahi prompts combine karke koi bhi beginner professional-level emotional aesthetic edits create kar sakta hai. Provided prompts ko copy karein, customisation guidance ke sath try karein, aur apni storytelling visual skills ko improve karein. Happy Editing!